
Ready for our second episode of How To Pour Latte Art? Today, we’re starting on Part 2 of our beginner’s guide to latte art. In the last installment, we established everything you need to begin practicing latte art. Now, we're just going to continue with that journey and discuss the topics that will set you on your way to steaming quality milk within your own home.
Within this series, we're not taking anything for granted. The aim here is to cover everything you need to know about steaming and pouring latte art. If you're here to learn how to pour a fancy pattern, then stay tuned as this series heats up.
Should You Brew Espresso Or Steam Milk First?
Now, let's jump straight into beginners’ latte art for the home barista, part 2. We begin today by discussing the question of, ideally, which is the better product to prepare first? Is it the espresso? Or, do I steam my milk first? This might seem obvious to some, but others may be using manual brewing gear or even an espresso machine such as a single boiler that doesn't allow for simultaneous production of espressos and steam.
Where possible, I will always recommend making the espressos first. This is because once you've gone and steamed your milk, there is more of a rapid decline in the texture of the steamed milk. If left sitting for too long, it will no longer be suitable for latte art.

A good rule here is to brew your espressos first and then focus on the milk. Additionally, since espresso can also lose its quality, I come back to something I mentioned in the previous latte art video. That is, so long as the espresso has a level of concentration that gives it its rich and dark color then, it's going to create contrast in the cup against the milk, and latte art will appear.
Tip: Batch Brew Multiple Cups Of Espresso Before Steaming Milk
The milk, on the other hand, is the Achilles heel of the whole process. If you don't steam your milk just right, or if you leave it sitting for too long after steaming it, the milk will be impossibly difficult to pour latte art with. On occasions when I've been practicing latte art, I often just rack up 6 to 8 espressos, leaving them sitting in the cups. Then I can at least have back-to-back sessions of steaming and pouring rather than having espresso brewing intermittently between each pour.
How Do You Steam Milk At Home?
With that, let's now prepare our milk jug for steaming. Now, we want to be using cold milk straight out of the fridge. This is your best friend, as it's going to take longer to heat up. That's giving you more time to achieve the correct volume of steamed milk we're aiming for. Warm milk, being the fact that it's closer to your ideal temperature, is going to heat up quickly, which will give you less time to perfect that consistency. There are a variety of milk frothers available if you're not comfortable with a steam wand, but best to learn as it will deliver the best results
Make Sure Your Jug Is The Right Size

Now, before filling your jug up with milk, first make sure you have the right size jug for the espresso cup that you will be using. Then, you want to go and visually divide that jug up into thirds. That first-third will fill with cold milk, or somewhere just above this third line is okay, depending on our results. The second-third is where we want to aim to have our milk stretched. When we've done steaming, the volume to the original amount of milk will be increased by the way of foaming it. If we land within this area and practically anywhere in between, this is going to be a great start, to begin with.
What Your Milk Texture Should Look Like

Now, let’s briefly discuss the texture of our milk froth. The amount of foam you've created, or the volume you've increased your milk by will also depend on how smooth that milk is, or how textured it is. Another way of saying this is, how small those bubbles in your milk are, and then how well incorporated they are into the rest of the body of the milk.
Troubleshooting Milk Volume
This relates closely to the placement during steaming, and we'll touch on this very soon. But with regards to that 3/3 section at the top of the jug, note that we're going to keep this empty throughout the process. If you have milk that's been steamed up to this section, then something has gone wrong and we're going to need to retrace our steps to see if we've used the right size jug for our cup, added the right amount of milk into the jug, to begin with, or perhaps incorrectly placed our steam wand and created too much volume in our milk.
If the opposite also happens, and you've discovered that you've poured your latte art but you didn't fill your cup up at the end, then you would also consider these three factors again to uncover a consistent volume you need from milk steaming.
I know it can be a little bit confusing when phrases are being thrown around, like milk texturing, adding volume, creating tight microbubbles, pulling the air in, getting the vortex going, and incorporating the volume, and the list goes on and on and on.
Milk Goals: Steaming Milk To The Right Temperature And Adding Volume
To simplify our aim when we are steaming milk, we have two things we are trying to achieve. The first is that we want to heat our milk to our choice of preferred drinking temperatures. Secondly, we're trying to add additional volume to our milk in the jug. Now, adding volume to our milk happens by way of using that steam wand to spin the milk around in the jug in that vortex-like fashion. Imagine a kind of motion like whipping eggs in a bowl, this creates bubbles that foam up and add that extra volume to your milk.
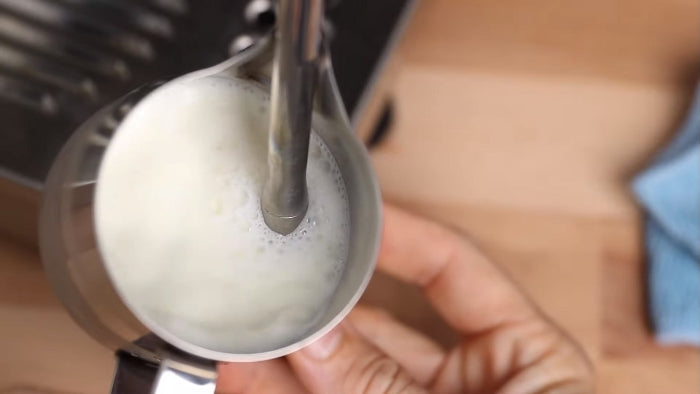
However, the reason for the spinning, as a crucial element of milk texturing, is that it reintroduces already made bubbles into the complete body of the milk, whilst simultaneously breaking down big bubbles in the process, into smaller and smaller bubbles. So, you end up with unidentifiable milk foam as those bubbles are so small.
In comparison, if I were to just hold my steam wand in a position where I didn't get the spin on it just right, then I would perhaps create more and more bubbles, though it would be a thicker style foam that wouldn't be so smooth. Having smaller bubbles that are consistently spread throughout the body of the milk not only expands its volume more evenly, but when we are drinking it, it'll lose the texture of the milk that we referred to as silky smooth a.k.a "microbubbles".
Another great characteristic of milk microbubbles, is that smaller bubbles stay together longer, and don't pop quite as quickly as larger bubbles do. So, your latte art is going to be there longer to appreciate.
What Is The Correct Temperature For Steamed Milk?
As for the temperature of your steamed milk, that's a little bit easier to explain, and it's generally to the preferred temperature that you enjoy it at. For the most part, that's 55 to 65 degrees Celsius range. That's the temperature that most cafes produce their steamed milk at. I would say 65 is pretty hot, but for hotter coffees, if you prefer it, 70 degrees is possible. However, if you make it any hotter, it ends up burning your milk above that range. So, I would avoid this, also because burns do become more serious at these higher temperatures, for example if the milk jug is accidentally dropped.

Now, at under 55 degrees Celsius, the drink could almost be considered lukewarm, not to forget the fact that when we're talking about steaming our milk, milk takes time to reach these temperatures. If you're steaming at a lower temperature, you've set yourself a challenge where you need to create bubbles and volume in your milk faster. That way, you have time to incorporate the bubbles into the milk and break those bubbles down to create that silky smooth milk.
How Can I Tell My Milk Temperature Without A Thermometer?
When using any sort of milk thermometer, checking the milk temperature is a great thing to learn to do. I often use one to double-check the temperatures after steaming my milk. Don't get me wrong, I'm not suggesting you don't use a milk thermometer during steaming, but it does kind of create one more thing to focus on when we could just be using our senses of touch, and our hands are very sensitive to temperature changes.
I use my palm and my fingertips to guide me through steaming in order to get the right temperature. This approach allows me to focus more on the steam wand placement. I don't have to focus on the temperature gauge either. With your hand under the jug to fill the temperature, you'll be surprised to see that you can build a pretty quick understanding of how hot that milk should be, after a few attempts and guesses. See, it's kind of a fun game I like to play, to see how hot I think the milk is, before I place my thermometer in there, to double-check. This way, I build the skill of feeling the right temperatures.

I will say, it's usually always cooler in the jug than what your hand is telling you. Knowing that and to get the right temperature while steaming, when I feel it's too hot to touch under the jug, I count in my mind, 1, 2, 3. Then I reach up to turn the steam wand off. That gets me consistently in that range of 58 to 65 degrees Celsius. The temperature of the milk will gradually rise, the longer you steam it for, whereas, you can kind of approach adding volume to the milk in a few different ways, at the start, through the middle or constantly.
What Happens When You Steam Milk?
To clarify what we've learned so far about adding volume. Two different actions are occurring when we spin the milk. One is creating bubbles. The second is breaking those bubbles down, smaller and smaller, and incorporating them into the body of the milk. Machines and steam wands will vary on how fast they can spin the milk and how effective they are at steaming milk, based on the machines, pressure, and power limitations.
For decent milk steaming, you want at least 1.2 bars of steam pressure, but ideally, I would say around 1.24 bars of pressure. That's a steam boiler temperature set within a range of 122 to 128 degrees Celsius to attain those pressures. Also, the amount of steam holes in that steam tip is important and equally impacts the force of the steam coming out. You either have a one-, two-, three-, or four-hole steam tip, three or four is ideal for a good spin, but the more holes you have, then the more pressure is being released at once. You then need a good amount of power behind it to make that steam effective. This is partly why so many machines use one- or two-hole steam tips.

Using one hole isn't hard, but it takes a little bit longer to get the same results, as you can imagine, since having two-hole tips will speed up the heating process, as well as help the spinning of the milk to create that volume a little bit faster.
How To Hold The Milk Jug While Steaming Milk
Here's how to hold the jug whilst you're steaming:
- First, use your dominant hand to hold the jug, which is also the hand you'll pour your latte art with.
- Place your thumb on top of the handle.
- Then, place your pointer, and middle finger inside the handle with one or two fingers sitting outside the handle to counterbalance the jug whilst you're steaming.
- Then, use your non-dominant hand to reach up and turn the steam wand on.
- Place your non-dominant hand under the jug now to check the temperature of the milk.
- When you get to that temperature, reach back up to turn the steam wand on. In following this approach, you're not swapping hands throughout the process.
That wraps it up for this episode of beginner's guide to latte art. I know we didn't get to any of the juicy stuff yet. But next video, we're going to jump straight into how to position your milk jug and the steam wand while steaming milk. So, stay tuned for that one here at Alternative Brewing!
Ready to get back to basics? Take a look at our last installment on How To Pour Latte Art: The Basics.
